


Bringing an "artifacting" graphics card back to life.
Page 1 of 1 • Share


Bringing an "artifacting" graphics card back to life.
![]() by The_gh0stm4n Sat 31 May 2014, 23:05
by The_gh0stm4n Sat 31 May 2014, 23:05
WARNING: Proceed with utmost caution and at your own risk. I do not assume any liability because of any of your wrongdoings. You should NOT attempt this solution if you still have warranty on your graphics card and/or computer. In that case, just let the card get replaced.
Likewise, DO NOT attempt this solution if you feel too 'afraid' or insecure. It's usually better to agree to not being able to do something rather than attempting something, and doing more damage. Besides, if you do not want to heat up electronic components in the same oven that you use for cooking/baking, then this solution isn't the right thing for you anyway...
Hello all,
Today I'd like to show you "what" I did to my graphics card that was artifacting like mad. An example screenshot of such a GPU distortion is this here:

This is not from my computer, but I got pretty much the same "red lines". Also, keep in mind that there are a variety of possible visual distortions...anyhow, before this happened, I noticed some weird flickering on the screen, after which I got a BSoD ("blue screen of death"), with the bluescreen code 116. The computer wouldn't even let me boot it up, except in safe mode, in which I got these red lines.
The idea I had in mind to try is based on visits of PCB ("printed circuit board") manufacturing plants, over in the US. They basically used huge "ovens" in which motherboards and graphics cards were simply "heated up" if they didn't pass functionality tests. After some additional research, I found that this "heat method" could also be used for graphics cards that were having these "artifacts" (in simple terms, visual distortions). Despite being a bit of a long shot, since heat is of course not everything when it comes to PCB, the idea behind heat is that the hardened liquid metal inside the circuit board, (henceforth: "solder") - in former times lead, today usually some mixture of silver, copper, tin or other non-lead materials - somewhat "dries up". Therefore, heat can be applied to the circuit board to melt the metals again, and allow it to "refreshen" itself, for a lack of a better expression. Occasionally, special "heat guns" are used to apply heat to certain parts of the boards, but for this to work, you need to know where exactly to apply the heat to. As for me, I chose the "oven solution"...
As will be shown in the following, there are some risks involved in such a procedure, but let's see. The following is a reconstruction of the disassembly, heating up, and the re-assembly of an (old) NVIDIA GeForce GT330; and you should be able to apply this procedure to (almost ?) all "modern" graphics cards. And yes, in that situation I had nothing really to "lose": if it works, then I'm happy, but if not, then the situation is still the same, i.e. namely that I don't have a working graphics card.
1) Make sure to plug out all cables that connect the tower to any other component. Power off the power supply (usually, on the back of the tower, you'll find a switch for that). And here is my desktop tower with its side panel opened up (yes, that's an older model, but that shouldn't matter as for the actual solution). *EDIT* after plugging out the computer and powering off the power supply, I strongly suggest you wait for a couple of hours with opening up the computer.
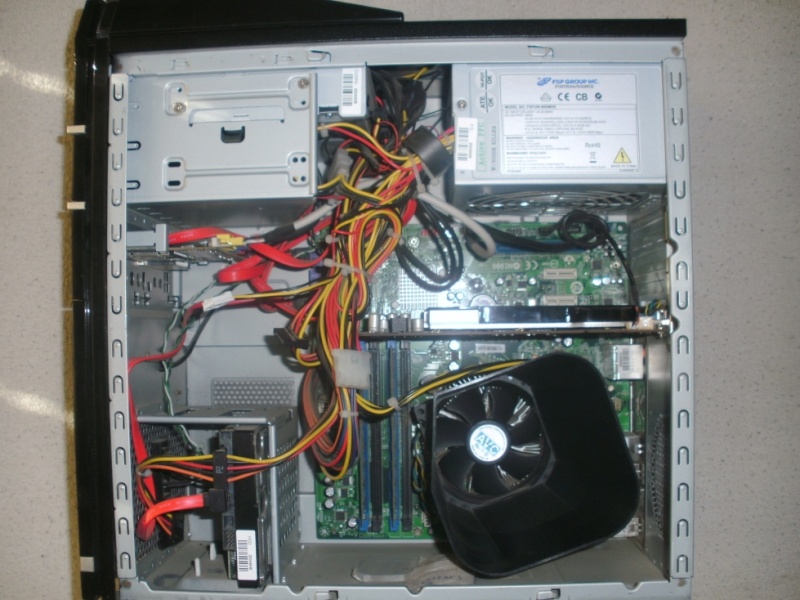
2) A closer view of the graphics card; the arrow on the left showing the actual graphics card and the one on the right the cable connection to the motherboard, which you need to plug out:

Yes, it's a bit dusty inside that computer; and I made sure - later on - to remove the dust...

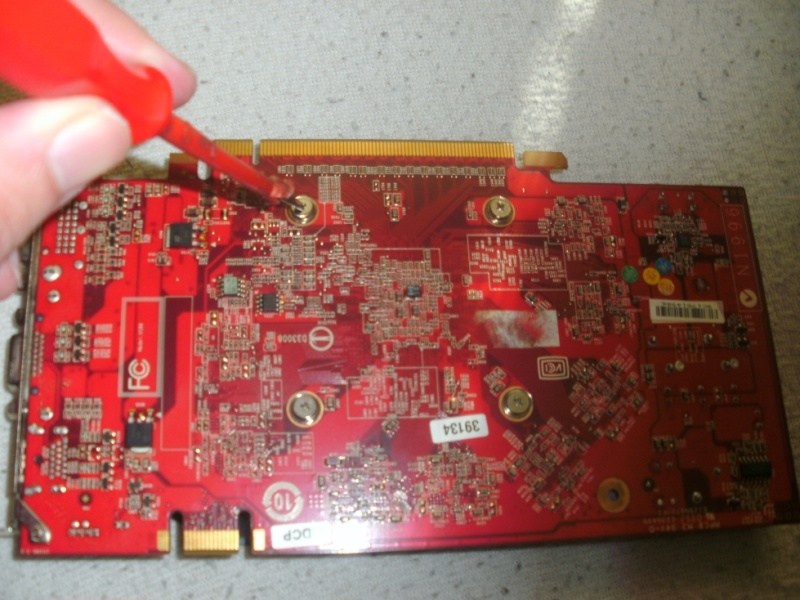
3) Now plug out the graphics card out of its PCI-E slot on the motherboard; if you're doing this the first time, be extremely careful. Especially on "ready-to-use" computers it can be a bit difficult to remove the card from the PCI-E slot. Don't apply too much pressure ! In contrast, if you're doing this on a custom-built computer, it will *probably* be a bit easier to remove the card. Make sure not to touch the PCI-E connectors on the graphics card too much (in the picture, the connectors on the right side of the card), although, if your hands are clean, it shouldn't be THAT big of a deal, but still, try to avoid that.

4) Now, I'm removing the cooling fan/heatspreader from the card because I only want to heat up the card, and not the cooling fan. Besides, if I heated the card up together with the cooling fan, the heat cannot spread evenly across the card....usually, you'll find screws on the bottom of the card, which hold the cooling fan. Make sure you do this procedure on the table, where you can easily "see" the screws once they fall out. Or in my case, do this on the bedsheet (ever tried finding a small screw on a dark-colored carpet floor, for example ? You get the idea).
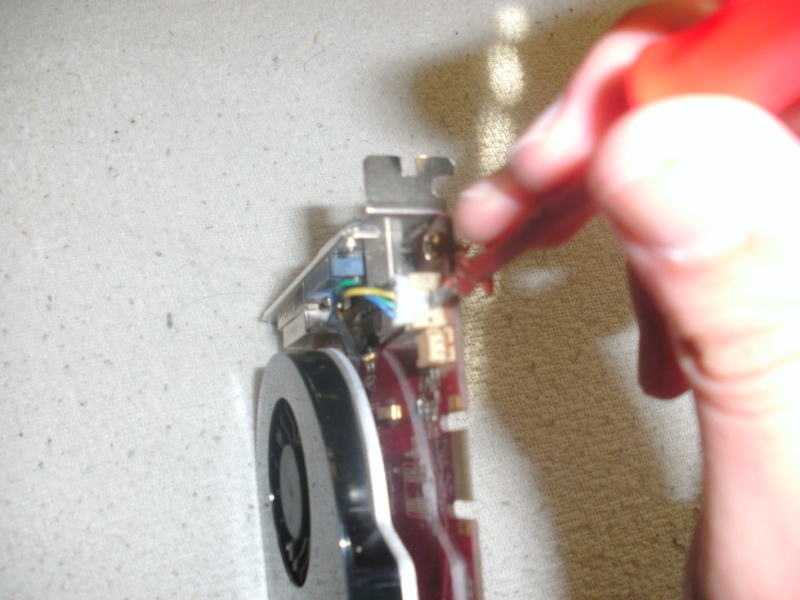
5) Pay attention to the cable connection between the graphics card and the cooling fan; if you're finding it difficult to remove it, don't apply too much pressure ! I found that a relatively easy way to remove this cable connection is to try and put a small screwdriver between the cable plug and the holding mechanism. Once you manage that, slowly pry the two apart with the screwdriver. The picture in this case isn't that good unfortunately, but look here:
6) You should end up with the cooling fan and card separated from each other:

7) The white "substance" you see on the graphics chip are the remnants of the thermal paste, which I then carefully removed with a soft cloth that was "slightly" soaked with water. So don't use too much water, if you can avoid it. After the whole procedure is done, re-apply some thermal paste on it, when re-assembling the card, before putting it back into the tower. In very simple terms, thermal paste helps "transport" the heat from the graphics chip onto the heatspreader, i.e. the metallic bottom of the cooling fan, thereby decreasing the "heat pressure" if you wish. Thermal paste isn't that expensive; at least, in my opinion, you don't need to buy the most expensive paste.
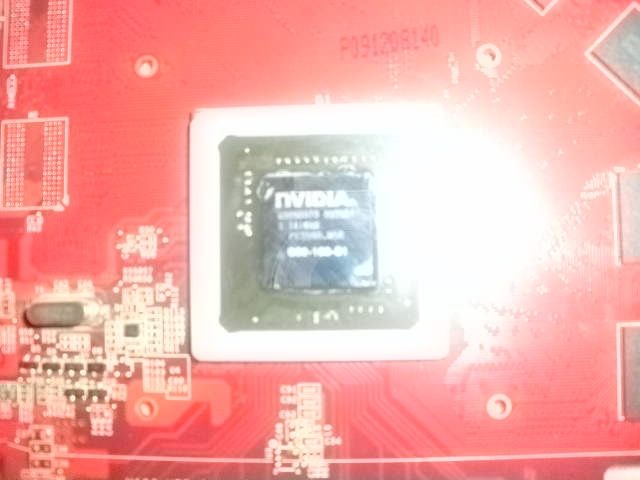
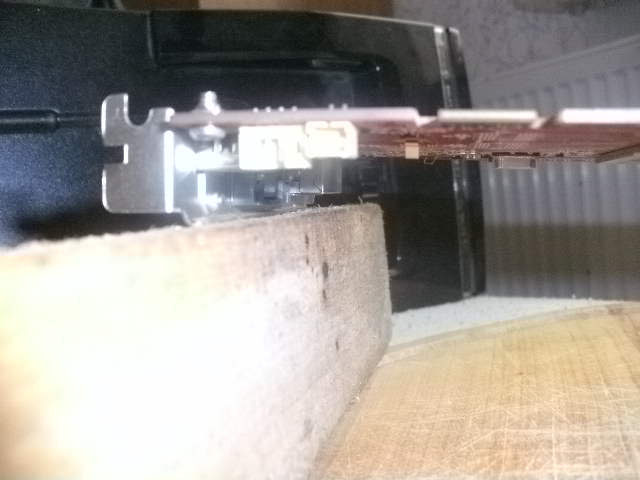
8. I'm now constructing a very simple holding structure on which the graphics card can rest during its time in the oven. I used wood for that, because wood doesn't transport heat easily (i.e. you certainly don't want to use any kind of metal that transports heat very well, risking even more damage to your card). Make sure that the holding structure really only touches the very edges of the card, and NOT any sensitive components. Also, make sure that the actual graphics chip (in my screenshot above, the part where "NVIDIA" or any other manufacturer's name is printed on) faces DOWNWARDS. Since this is a vital component, the heat can spread more easily to this chip, compared to when the chip is located upwards.


9. Now...into the kitchen ! As a temperature guideline, I chose 200 degrees of Celsius, or about 380 degrees Fahrenheit, since that's the temperature at which the most common "solder" mixtures will melt and reflow. You may choose a slightly lower temperature, but you shouldn't choose a much bigger temperature than what I mentioned. Make sure that you pre-heat the oven for approximately 8 minutes, for it to reach the ideal temperature.
After the pre-heating, leave the card inside the oven for 8 -10 minutes, but NOT MORE. You don't want to "melt" your card completely, so please make sure to actually stand by the oven the whole time, even with a stop watch if you want.
After the heat procedure is done, put the whole thing down somewhere, for it to cool down. It should cool down for at least an hour. (note: after that you are theoretically ready to re-assemble the card, but I chose another heating session, so putting it back into the oven for another 8 - 10 minutes, and letting it cool down for another hour. But this is an optional move; again, heating the card up once might already be enough).

10. Another small extra: do you notice these "springs" on the screw holding the cooling fan to the card ? This is often done with the idea that the screw cannot "touch" the graphics card completely, because these springs are in-between. "Less touching space", here, means less "heating pressure", and a smaller likelihood of damage to the card due to heat. I guess that the added advantage (the springs themselves can get hot too) is only a small one, but a small advantage is still better than nothing.

Now..after you cooled down the card for at least an hour, re-assemble the card by reversing all the steps I mentioned. And then power the computer back on to see if anything changed.
And yes, in my case, a miracle happened, and the card worked again. In fact, I'm still using it, although I have also ordered a newer card (a Radeon HD 7790, by the way). But yes, this GeForce GT 330 card is still working for me. However, I'm not really "counting" on this computer too much anymore; I'm thinking of building a new desktop computer in the coming months.
That's it basically ! Good luck, if you encounter the problem and attempt this solution.

P.S. I strongly recommend you clean the inside of the oven after this procedure....
Should this 'solution' not work for you, then most likely you will have to buy a NEW graphics card. While from a technical point of view, there is a foundation to this procedure, I cannot guarantee that this will work for everybody, and in all circumstances. For instance, the graphics card may have taken damage due to a power surge, or it may have any other damage, that can't be solved by making the solder 'reflow'.
So if you still post in this topic saying that 'this doesn't work for you', then I can't really help you beyond that. However, I would appreciate it, if people with the same issue just posted on here - to see if this works for somebody else too, besides me.
Likewise, DO NOT attempt this solution if you feel too 'afraid' or insecure. It's usually better to agree to not being able to do something rather than attempting something, and doing more damage. Besides, if you do not want to heat up electronic components in the same oven that you use for cooking/baking, then this solution isn't the right thing for you anyway...
Hello all,
Today I'd like to show you "what" I did to my graphics card that was artifacting like mad. An example screenshot of such a GPU distortion is this here:
This is not from my computer, but I got pretty much the same "red lines". Also, keep in mind that there are a variety of possible visual distortions...anyhow, before this happened, I noticed some weird flickering on the screen, after which I got a BSoD ("blue screen of death"), with the bluescreen code 116. The computer wouldn't even let me boot it up, except in safe mode, in which I got these red lines.
The idea I had in mind to try is based on visits of PCB ("printed circuit board") manufacturing plants, over in the US. They basically used huge "ovens" in which motherboards and graphics cards were simply "heated up" if they didn't pass functionality tests. After some additional research, I found that this "heat method" could also be used for graphics cards that were having these "artifacts" (in simple terms, visual distortions). Despite being a bit of a long shot, since heat is of course not everything when it comes to PCB, the idea behind heat is that the hardened liquid metal inside the circuit board, (henceforth: "solder") - in former times lead, today usually some mixture of silver, copper, tin or other non-lead materials - somewhat "dries up". Therefore, heat can be applied to the circuit board to melt the metals again, and allow it to "refreshen" itself, for a lack of a better expression.
As will be shown in the following, there are some risks involved in such a procedure, but let's see. The following is a reconstruction of the disassembly, heating up, and the re-assembly of an (old) NVIDIA GeForce GT330; and you should be able to apply this procedure to (almost ?) all "modern" graphics cards. And yes, in that situation I had nothing really to "lose": if it works, then I'm happy, but if not, then the situation is still the same, i.e. namely that I don't have a working graphics card.
1) Make sure to plug out all cables that connect the tower to any other component. Power off the power supply (usually, on the back of the tower, you'll find a switch for that). And here is my desktop tower with its side panel opened up (yes, that's an older model, but that shouldn't matter as for the actual solution). *EDIT* after plugging out the computer and powering off the power supply, I strongly suggest you wait for a couple of hours with opening up the computer.
2) A closer view of the graphics card; the arrow on the left showing the actual graphics card and the one on the right the cable connection to the motherboard, which you need to plug out:
Yes, it's a bit dusty inside that computer; and I made sure - later on - to remove the dust...
3) Now plug out the graphics card out of its PCI-E slot on the motherboard; if you're doing this the first time, be extremely careful. Especially on "ready-to-use" computers it can be a bit difficult to remove the card from the PCI-E slot. Don't apply too much pressure ! In contrast, if you're doing this on a custom-built computer, it will *probably* be a bit easier to remove the card. Make sure not to touch the PCI-E connectors on the graphics card too much (in the picture, the connectors on the right side of the card), although, if your hands are clean, it shouldn't be THAT big of a deal, but still, try to avoid that.
4) Now, I'm removing the cooling fan/heatspreader from the card because I only want to heat up the card, and not the cooling fan.
5) Pay attention to the cable connection between the graphics card and the cooling fan; if you're finding it difficult to remove it, don't apply too much pressure ! I found that a relatively easy way to remove this cable connection is to try and put a small screwdriver between the cable plug and the holding mechanism. Once you manage that, slowly pry the two apart with the screwdriver. The picture in this case isn't that good unfortunately, but look here:
6) You should end up with the cooling fan and card separated from each other:
7) The white "substance" you see on the graphics chip are the remnants of the thermal paste, which I then carefully removed with a soft cloth that was "slightly" soaked with water. So don't use too much water, if you can avoid it.
8. I'm now constructing a very simple holding structure on which the graphics card can rest during its time in the oven. I used wood for that, because wood doesn't transport heat easily (i.e. you certainly don't want to use any kind of metal that transports heat very well, risking even more damage to your card). Make sure that the holding structure really only touches the very edges of the card, and NOT any sensitive components. Also, make sure that the actual graphics chip (in my screenshot above, the part where "NVIDIA" or any other manufacturer's name is printed on) faces DOWNWARDS. Since this is a vital component, the heat can spread more easily to this chip, compared to when the chip is located upwards.
9. Now...into the kitchen !
After the pre-heating, leave the card inside the oven for 8 -10 minutes, but NOT MORE. You don't want to "melt" your card completely, so please make sure to actually stand by the oven the whole time, even with a stop watch if you want.
After the heat procedure is done, put the whole thing down somewhere, for it to cool down. It should cool down for at least an hour. (note: after that you are theoretically ready to re-assemble the card, but I chose another heating session, so putting it back into the oven for another 8 - 10 minutes, and letting it cool down for another hour. But this is an optional move; again, heating the card up once might already be enough).
10. Another small extra: do you notice these "springs" on the screw holding the cooling fan to the card ? This is often done with the idea that the screw cannot "touch" the graphics card completely, because these springs are in-between. "Less touching space", here, means less "heating pressure", and a smaller likelihood of damage to the card due to heat. I guess that the added advantage (the springs themselves can get hot too) is only a small one, but a small advantage is still better than nothing.
Now..after you cooled down the card for at least an hour, re-assemble the card by reversing all the steps I mentioned. And then power the computer back on to see if anything changed.
And yes, in my case, a miracle happened, and the card worked again. In fact, I'm still using it, although I have also ordered a newer card (a Radeon HD 7790, by the way). But yes, this GeForce GT 330 card is still working for me. However, I'm not really "counting" on this computer too much anymore; I'm thinking of building a new desktop computer in the coming months.
That's it basically ! Good luck, if you encounter the problem and attempt this solution.
P.S. I strongly recommend you clean the inside of the oven after this procedure....
Should this 'solution' not work for you, then most likely you will have to buy a NEW graphics card. While from a technical point of view, there is a foundation to this procedure, I cannot guarantee that this will work for everybody, and in all circumstances. For instance, the graphics card may have taken damage due to a power surge, or it may have any other damage, that can't be solved by making the solder 'reflow'.
So if you still post in this topic saying that 'this doesn't work for you', then I can't really help you beyond that. However, I would appreciate it, if people with the same issue just posted on here - to see if this works for somebody else too, besides me.
Last edited by Carlos on Wed 04 Jun 2014, 03:19; edited 2 times in total (Reason for editing : Corrected a few typos; some additional info added.)

The_gh0stm4n- G4TW RETIRED Forum Gatekeeper

- Windows version :
- Windows 8
- Windows 7
- Windows XP
- Windows 10
System architecture :- 32 bits (x86)
- 64 bits (x64)
Favourite games : The Sims 3, L.A. Noire, Saints Row, Red Faction, Team Fortress 2, Overwatch, PvZ: Garden Warfare, Call of Duty: Ghosts, GTA: San Andreas, Counter-Strike, Hitman, Borderlands, The Binding of Isaac, Government simulation & Military strategy games, S.W.A.T. 4, GTA Online, Red Dead Online, Chessmaster XI, Monster Hunter: World, Paint the Town Red, The Elder Scrolls Online, Destiny 2.

Posts : 18959
Points : 27051
Join date : 2012-11-02
Location : Liechtenstein / Switzerland / Austria

Re: Bringing an "artifacting" graphics card back to life.
![]() by Admin Sun 01 Jun 2014, 22:32
by Admin Sun 01 Jun 2014, 22:32
Hi Carlos,
Thank you for your extensive guide!
Wow, you only see these kind of suggestions on the internet. :p
Anyway, just a little side-note: before starting, also make sure to unplug the power chord from the back of the PC (so not only the switch, but both) and after doing so, click the ON button a few times, to discharge all of the electricity that's still there. (If you have those little LED lights somewhere on your PC, you'll notice that they'll remain on, even after unplugging the PC. That's the "leftover" energy we need to get rid of, for maximum security)
If you're really paranoid, you might also want to use an ESD wrist wrap, to prevent damaging the electronic components of the PC.

Admin- G4TW RETIRED Adminator
GΛMΣ MΛƧƬΣЯ / Forum Founder
- Windows version :
- Windows 8
- Windows 7
System architecture :- 32 bits (x86)
- 64 bits (x64)
Posts : 18882
Points : 1028834
Join date : 2010-03-12
Re: Bringing an "artifacting" graphics card back to life.
![]() by The_gh0stm4n Wed 04 Jun 2014, 02:26
by The_gh0stm4n Wed 04 Jun 2014, 02:26
Admin wrote:Hi Carlos,
Thank you for your extensive guide!
Wow, you only see these kind of suggestions on the internet. :p
Anyway, just a little side-note: before starting, also make sure to unplug the power chord from the back of the PC (so not only the switch, but both) and after doing so, click the ON button a few times, to discharge all of the electricity that's still there. (If you have those little LED lights somewhere on your PC, you'll notice that they'll remain on, even after unplugging the PC. That's the "leftover" energy we need to get rid of, for maximum security)
If you're really paranoid, you might also want to use an ESD wrist wrap, to prevent damaging the electronic components of the PC.
Yes, I actually mentioned in the topic (right at the beginning) to plug out all cables AND to power off the power supply too...
Yes, this is a common tip, but I'm not sure though if pressing the on button (even if several times) is a 100% reliable solution for discharging leftover power. It seems that most (?) modern computers are designed - for safety reasons - in a way, that they discharge themselves after a while, after plugging out the cables and powering off the PSU. As mentioned, in my case I simply waited a couple of days (altough, I don't think that time period would've been necessary).
Still, pressing the on-button is an option. But I keep in mind that there is ALWAYS a risk, even if you press that button.
Very briefly, the (theoretically) safest way to discharge the most dangerous component (i.e. power supply unit) is properly "short-circuit" it; (not sure if that's the right word). Professionals have resistor-based tools with which they connect the two poles of a PSU, and hence can discharge that thing. Meaning: unless you have the right tools and know what you're doing, you should NOT mess with the power supply.
But that is OFF-TOPIC actually, and should be discussed in a different thread.
//EDIT
In addition to all this, you can apply the solution (especially the part about the removal of the graphics card from the motherboard) with these household rubber gloves...
The_gh0stm4n- G4TW RETIRED Forum Gatekeeper
- Windows version :
- Windows 8
- Windows 7
- Windows XP
- Windows 10
System architecture :- 32 bits (x86)
- 64 bits (x64)
Favourite games : The Sims 3, L.A. Noire, Saints Row, Red Faction, Team Fortress 2, Overwatch, PvZ: Garden Warfare, Call of Duty: Ghosts, GTA: San Andreas, Counter-Strike, Hitman, Borderlands, The Binding of Isaac, Government simulation & Military strategy games, S.W.A.T. 4, GTA Online, Red Dead Online, Chessmaster XI, Monster Hunter: World, Paint the Town Red, The Elder Scrolls Online, Destiny 2.
Posts : 18959
Points : 27051
Join date : 2012-11-02
Location : Liechtenstein / Switzerland / Austria
» Bringing the "dead" Nintendo 3DS (XL) back to life: a possible fix.
» The Sims 4 Seasons [version 1.44.77.1020] OUT NOW!!
» Laptop graphics card help?
» Need help with buying new graphics card
» EXTERNAL GRAPHICS CARD?
» The Sims 4 Seasons [version 1.44.77.1020] OUT NOW!!
» Laptop graphics card help?
» Need help with buying new graphics card
» EXTERNAL GRAPHICS CARD?
Page 1 of 1
Permissions in this forum:
You cannot reply to topics in this forum|
|
|